Reversing Camera Systems for Caravans and RVs
Stay aware of your surroundings with wired reversing cameras for caravans and RVs. These systems include durable cameras and crisp LCD displays, helping you park and manoeuvre safely whether you're towing or driving solo.


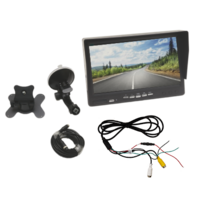

Park, hitch, and change lanes with confidence. Our caravan reversing cameras and 7in monitor kits from NCE give you a wide, steady view behind the van in daylight and low light. Choose single, dual, or quad setups for RVs, caravans, and large tow vehicles that need reliable vision on Australian roads.
- Wired reliability for caravans with a stable picture and no dropouts
- Wide-angle views for hitching and lane changes with clear distance cues
- Night vision and weather sealing for rain, dust, and corrugations
- Inputs for dual or quad views on a single 7in TFT LCD monitor
- 4-pin aviation connectors for secure joins and tidy installs
How to choose a caravan reversing camera
1) View layout
- Single camera for simple reversing and hitching.
- Dual camera with one lens set for constant road view and the second angled down for close reversing. See the NCE 7in Dual Camera Kit, White.
- Quad camera to combine rear, high rear, and side views for long vans and tight parks. Consider the NCE 7in Quad Camera Kit.
2) Monitor choice
- 7in TFT LCD is the sweet spot for visibility without blocking the dash.
- Check the number of inputs to match dual or quad channels.
- Pick a mount that holds firm on rough surfaces and sits within your line of sight.
3) Cabling and connectors
- Measure from the monitor position to the rear of the van then add slack for routing. Many installs need 10-15m total run.
- Use shielded 4-pin leads for clean signal and secure joins. The NCE 7in Wired Camera Kit is a straightforward option.
- If adapting from RCA, use proper adaptors and avoid long unshielded runs to reduce interference.
4) Picture quality and setup
- AHD cameras provide a sharper image than older CVBS. Match camera and monitor formats.
- Wide angles around 120° suit reversing without heavy distortion.
- Mirror/normal image per channel lets you mount high or low and still get a natural view.
- Adjust on-screen guidelines and brightness for day and night conditions.
5) Durability for touring
- Look for IP67 or higher for water and dust resistance.
- Check operating temperature range if you tour in hot or alpine conditions.
- Use strain relief at entry points and grommets with sealant where cables pass through panels.
6) Power and triggers
- Most kits run on 12V systems. Use a fused supply per the product instructions.
- A reverse trigger wire can auto-switch the monitor to the reversing channel.
- Side cameras can be triggered with indicators if your monitor supports it.
Most caravaners choose wired over wireless for towing. You get a stable picture across the drawbar and A-frame, fewer pairing issues, and better performance around metalwork and 12V electrics. For a quick 12V refresher on safe wiring and fuse selection, see our off-grid caravan power guide.
Shop the NCE range
- NCE 7in Quad Camera Kit
- NCE 7in Dual Camera Kit, White
- NCE 7in Wired Camera Kit
- NCE Dual Reverse Camera with 7in Monitor, Black
- NCE Reverse Camera with 7in Monitor, White
Install tips for caravans
- Plan cable runs before drilling. Follow existing conduits or loom paths where possible to protect the cable.
- Use grommets and sealant at entry points. Keep bends gentle and avoid tight pinch points around hinges and drawbars.
- Route video cables away from high-current lines to reduce noise. Cross power at right angles rather than running in parallel.
- Set guidelines on the monitor then test with a spotter. Aim a road-view lens to the horizon line and a reversing lens to just capture the bumper edge.
- Finish with strain relief and a weather shield on the camera if exposed to spray or dust.
Not sure which kit or cable length to pick? See Power & Electrical or chat with our team at Home & RV.
Reversing camera FAQs
Dual gives you a road view and a close reversing view on one 7in monitor, ideal for most vans. Quad suits larger rigs that benefit from rear and side views shown at once.
Wired is preferred on caravans. Cable runs across the A-frame provide a clean signal, stable picture, and less interference around metalwork and 12V electrics.
Measure from your monitor position to the rear of the van then add slack for routing. Many setups use 10-15m total. If unsure, choose the next size up.
Yes. Look for low-light sensitivity and IR LEDs. Night vision helps in dim camps and early starts. Keep lenses clean for the best result.
AHD delivers a sharper image than older analogue CVBS. Match the camera and monitor formats to get the full benefit.
Models in this collection carry IP ratings such as IP67, built for rain and dust on Australian roads. Check each product page for the exact rating.
Yes. Many drivers keep a constant rear view for lane changes and traffic awareness. Use a dual setup to keep one lens for close reversing when needed.
Yes. These kits are designed for 12V caravan and tow-vehicle systems. Always follow the wiring guide and fuse recommendations on the product page.
Many owners DIY with basic tools. If you are short on time or prefer a tidy concealed run, a professional installer will route cables, mount cameras, and calibrate the monitor for you.